# Start by importing requests
import requestsSend request
REST APIs
Rest APIs function by sending a request, the request is communicated via HTTP message.
- The HTTP message usually contains a JSON file. This contains instructions for what operation we would like the service or resource to perform.
- In a similar manner, API returns a response, via an HTTP message, this response is usually contained within a JSON.
HTML Basics
The Process
Web scraping, also known as web harvesting or web data extraction, is the process of extracting information from websites or web pages. It involves automated retrieval of data from web sources.
HTTP request
When you, the client, use a web page your browser sends an HTTP request to the server where the page is hosted. The server tries to find the desired resource by default “index.html”. If your request is successful, the server will send the object to the client in an HTTP response. This includes information like the type of the resource, the length of the resource, and other information.
- The process typically begins with an HTTP request.
- A web scraper sends an HTTP request to a specific URL, similar to how a web browser would when you visit a website.
- The request is usually an HTTP GET request, which retrieves the web page’s content.
Web page retrieval
- The web server hosting the website responds to the request by returning the requested web page’s HTML content. This content includes the visible text and media elements and the underlying HTML structure that defines the page’s layout.
HTML parsing
- Once the HTML content is received, you need to parse the content.
- Parsing involves breaking down the HTML structure into components, such as tags, attributes, and text content.
- You can use BeautifulSoup in Python. It creates a structured representation of the HTML content that can be easily navigated and manipulated.
Data Extraction
- With the HTML content parsed, web scrapers can now identify and extract the specific data they need.
- This data can include text, links, images, tables, product prices, news articles, and more.
- Scrapers locate the data by searching for relevant HTML tags, attributes, and patterns in the HTML structure.
Data transformation
- Extracted data may need further processing and transformation.
- For instance, you can remove HTML tags from text, convert data formats, or clean up messy data.
- This step ensures the data is ready for analysis or other use cases.
Storage
- After extraction and transformation, you can store the scraped data in various formats, such as databases, spreadsheets, JSON, or CSV files.
- The choice of storage format depends on the specific project’s requirements.
Automation
- In many cases, scripts or programs automate web scraping.
- These automation tools allow recurring data extraction from multiple web pages or websites.
- Automated scraping is especially useful for collecting data from dynamic websites that regularly update their content.
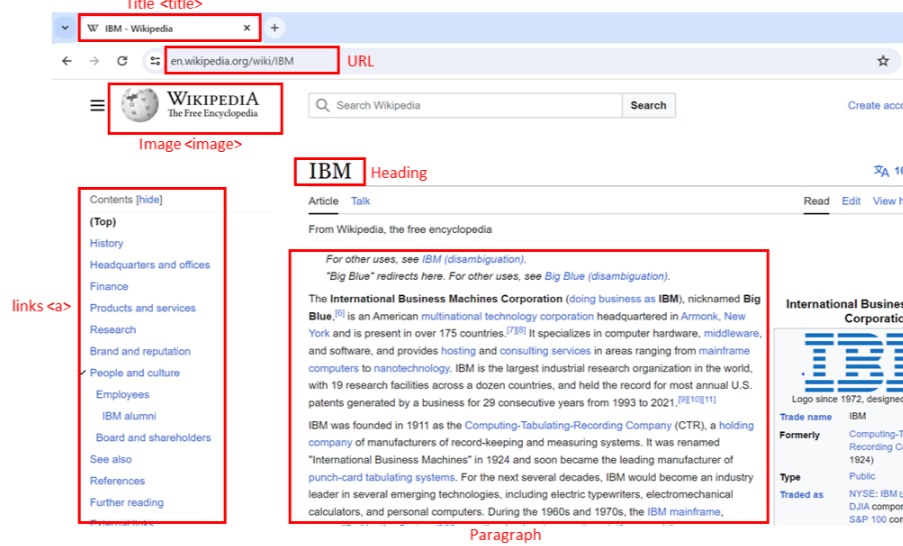
HTML Structure
Hypertext markup language (HTML) serves as the foundation of web pages. Understanding its structure is crucial for web scraping.
<html>is the root element of an HTML page.<head>contains meta-information about the HTML page.<body>displays the content on the web page, often the data of interest.<h3>tags are type 3 headings, making text larger and bold, typically used for player names.<p>tags represent paragraphs and contain player salary information.
HTML Tag
HTML tags define the structure of web content and can contain attributes.
- An HTML tag consists of an opening (start) tag and a closing (end) tag.
- Tags have names (
<a>for an anchor tag). - Tags may contain attributes with an attribute name and value, providing additional information to the tag.
HTML Tree
You can visualize HTML documents as trees with tags as nodes.
- Tags can contain strings and other tags, making them the tag’s children.
- Tags within the same parent tag are considered siblings.
- For example, the
<html>tag contains both<head>and<body>tags, making them descendants of<htmlbut children of<html>.<head>and<body>are siblings.

HTML Tables
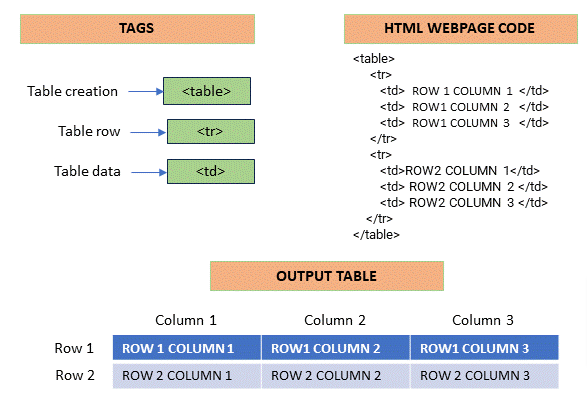
HTML tables are essential for presenting structured data.
- Define an HTML table using the
<table>tag. - Each table row is defined with a
<tr>tag. - The first row often uses the table header tag, typically
<th>. - The table cell is represented by
<td>tags, defining individual cells in a row.
HTTP Request Method
Now that we covered The Process, and HTML structure let’s put it all together and recap:
When you, the client, use a web page your browser sends an HTTP request to the server where the page is hosted. The server tries to find the desired resource by default “index.html”. If your request is successful, the server will send the object to the client in an HTTP response. This includes information like the type of the resource, the length of the resource, and other information.
URL
We send the HTTP Request to a URL, what’s a Uniform Resource Locator (URL)?
URL is broken down by:
- Scheme: the protocol such as http://
- Base URL: used to find the location such as www.yourdataiq.com
- Route: this is the location on the server such as /images/blah.png
There are different HTTP request methods, you can import the request library with import requests
Request
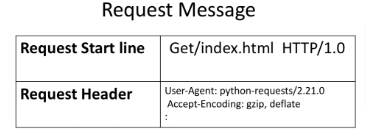
- The process can be broken into the Request and Response process.
- The request using the get method is partially illustrated below.
- In the start line we have the
GETmethod, this is anHTTPmethod. Also the location of the resource/index.htmland theHTTPversion. - The Request header passes additional information with an
HTTPrequest:
- When an HTTP request is made, an HTTP method is sent which tells the server what action to perform.
- A list of possible actions is below
| HTTP METHODS | Description |
|---|---|
| GET | Retrieves data from the server |
| POST | Submits data to the server |
| PUT | Updates data on the server |
| DELETE | Deletes data from the server |
Response
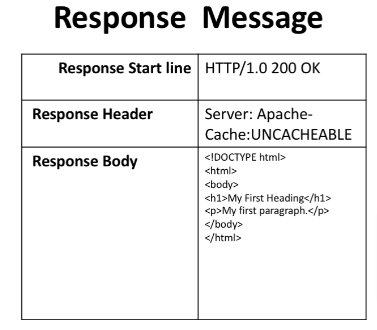
- Response is what we get back from the server
- starts out with the version number and status code, followed by a descriptive phrase (OK)
- Header contains useful information
- Body which contains the information we requested in an HTML document
- Note: some requests can have headers
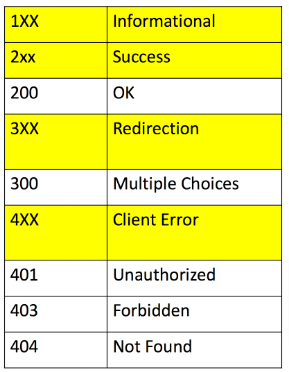
Status Codes
- Some status codes are shown in the image above
Example - Text Request
Setup
- Let’s send a GET request to IBM main page www.ibm.com
- os allows us to perform tasks such as:
- accessing and manipulating files
- getting info about the working directory
- creating, renaming, deleting directories and files
- executing shell commands
- Setup the URL to be www.ibm.com, I named it url1 so we don’t get it confused with the example later in this section
- Send a get requests and assign the response to resp
url1 = 'https://www.ibm.com/'
resp = requests.get(url1)
Read Response Code
- As you see in the code: 200 = OK
resp.status_code200List Request Headers
- You can use the request.header to view the header
resp.request.headers{'User-Agent': 'python-requests/2.32.3', 'Accept-Encoding': 'gzip, deflate', 'Accept': '*/*', 'Connection': 'keep-alive', 'Cookie': '_abck=D8E4A32A4A08FFF211DCE49BFC738997~-1~YAAQHipDF6ENr7qTAQAAwn8T1w1RQyoB9HzhJk8b6jyS4OEZ3gGGwAm+vZZgkwfH2w+6Q6BwdVGx2YB1EWEB7Jb+Tspk5IQrr0pgW+865/NbwFguq1gbx1VQe7PA0IKy6AnhzJuxvHxomXu8pJZzCPCLHiyTcGuk5LZ8PpkckDyJ/wjQSuK2qMLYFV2HhtTlRThtIC/81B9zH3Q4Tq5fugeNUfOOVH9wEwtAZTvyhtJoaDPfpm3brWF4kP1YH/ypcfa0it45IbUi0o5UnSLbMnPChZOgjzrA3f5P9dPgHKCKaCPgAtLQHXf5E/L5UWTEvjysCV84bdRDroUMGiZ4CYAunOjL0nfOT1d7UHfNQDLvIZQxYY157QjsdtNNW+s3mXK0Z0t18xW7g1OhvUDEruJwgwrSx6E=~-1~-1~-1; bm_sz=2558B81B2BDAEE7E6D47023D9FFCC0A8~YAAQHipDF6INr7qTAQAAwn8T1xpzFN+gvNThbpaoph9racbHD3lvPtWPkC5/huG32iGbPC1Q6BW2ERsnFViXiruJMakX1eGkyB5kqBfJhQ1Qxk6hD1mahNdeuWtQDTKE1PLvY2kzqd/ddYLZ+GvvLb6IMRZw22jiKU7RJQLcFQLsY1Wx4wvejbbV0dcpoymXHlKJ3cNV5HRdik31SrsUu3IFwOXH/TEDy2xfkECgQJNS1SIiX7CHyvPdHpJUUFotjwoF6FLWjR53yaIZdPpuoNrePMnbnBijJgP2h00+xYu/n2z+8/1xyGEzszNXGnjDhsb9dg451Day8trq+ASKTnzQG/Ydmzroa/x1pYumia6xVqYeFxc2mXtgfxVQPSKycg==~4539969~3422017'}- or use the attribute headers, which returns a dictionary of HTTP response headers
- This might be easier to read
header = resp.headers
header
{'Content-Security-Policy': 'upgrade-insecure-requests', 'x-frame-options': 'SAMEORIGIN', 'Last-Modified': 'Tue, 17 Dec 2024 23:51:49 GMT', 'ETag': '"2ae8b-6297ffb0ac1d4-gzip"', 'Accept-Ranges': 'bytes', 'Content-Type': 'text/html;charset=utf-8', 'X-Content-Type-Options': 'nosniff', 'Cache-Control': 'max-age=600', 'Expires': 'Wed, 18 Dec 2024 00:13:19 GMT', 'X-Akamai-Transformed': '9 28588 0 pmb=mTOE,2', 'Content-Encoding': 'gzip', 'Date': 'Wed, 18 Dec 2024 00:03:19 GMT', 'Content-Length': '28805', 'Connection': 'keep-alive', 'Vary': 'Accept-Encoding', 'Strict-Transport-Security': 'max-age=31536000'}List Keys
- We can extract values from the header dictionary
- Let’s look at the keys list
list(header)['Content-Security-Policy',
'x-frame-options',
'Last-Modified',
'ETag',
'Accept-Ranges',
'Content-Type',
'X-Content-Type-Options',
'Cache-Control',
'Expires',
'X-Akamai-Transformed',
'Content-Encoding',
'Date',
'Content-Length',
'Connection',
'Vary',
'Strict-Transport-Security']Read Values
Now that we have the list of keys we can read any of the values
header['Date']'Wed, 18 Dec 2024 00:03:19 GMT'Look at the content-type
header['Content-Type']'text/html;charset=utf-8'Request Body
- As we mentioned before, the request doesn’t include anything in the body
- Response body is where the server returns the requested material, so the req_body is “blank or none”
req_body = resp.request.body
req_body
Read Text
- We noticed the content-type is text/html
- so let’s read the attribute text
resp.text[0:200]'\n<!DOCTYPE HTML>\n<html lang="en">\n<head>\r\n \r\n \r\n \r\n \r\n \r\n \r\n \r\n \r\n \r\n \r\n \r\n \r\n <meta charset="UTF-8"/>\r\n <meta name="languageCode" content="en"/>\r\n <meta'# Notice the only difference is b at the beginning of the output
resp.content[0:200]b'\n<!DOCTYPE HTML>\n<html lang="en">\n<head>\r\n \r\n \r\n \r\n \r\n \r\n \r\n \r\n \r\n \r\n \r\n \r\n \r\n <meta charset="UTF-8"/>\r\n <meta name="languageCode" content="en"/>\r\n <meta'Example - Image Request
- Just as we requested text in the above example, we can request an image
- I will not break this down into section as it is redundant
- I’ll place comments in the code
url2 = 'https://cf-courses-data.s3.us.cloud-object-storage.appdomain.cloud/IBMDeveloperSkillsNetwork-PY0101EN-SkillsNetwork/IDSNlogo.png'
req2 = requests.get(url2)
# list the keys in the header
heads = req2.headers
list(heads)['Date',
'X-Clv-Request-Id',
'Server',
'X-Clv-S3-Version',
'Accept-Ranges',
'x-amz-request-id',
'ETag',
'Content-Type',
'Last-Modified',
'Content-Length']heads['Content-Type']'image/png'Save Image
An image is a response object that contains the image as a bytes-like object. As a result, we must save it using a file object. First, we specify the file path and name
import os
from PIL import Image

path=os.path.join(os.getcwd(),'image.png')

# save the file using the content attribute
with open(path,'wb') as f:
    f.write(req2.content)

# view the image
Image.open(path)
Example Download File
Data
- Here is the file we want to download to our system
URL = <https://cf-courses-data.s3.us.cloud-object-storage.appdomain.cloud/IBMDeveloperSkillsNetwork-PY0101EN-SkillsNetwork/labs/Module%205/data/Example1.txtDownload & Save
import os
import requests
import pandas as pd

url='https://cf-courses-data.s3.us.cloud-object-storage.appdomain.cloud/IBMDeveloperSkillsNetwork-PY0101EN-SkillsNetwork/labs/Module%205/data/Example1.txt'
path=os.path.join(os.getcwd(),'example1.txt')
r=requests.get(url)
with open(path,'wb') as f:
    f.write(r.content)
GET Request
Similar to the HTTP get request, we can use the GET method to modify the results of our query.
- Just as before we send a GET request to the server.
- Like before we have the Base URL, in the Route we append
/get, this indicates we would like to preform aGETrequest.
url_get = 'http://httpbin.org/get'- A query string is a part of a uniform resource locator (URL), this sends other information to the web server. The start of the query is a
?, followed by a series of parameter and value pairs, as shown in the table below. The first parameter name isnameand the value isJoseph. The second parameter name isIDand the Value is123. Each pair, parameter, and value is separated by an equals sign,=. The series of pairs is separated by the ampersand&.

Create Dictionary to Pass
- To create a Query string, add a dictionary. The keys are the parameter names and the values are the value of the Query string.
payload={"name":"Joseph","ID":"123"}Send Request
- Pass the dictionary payload to the
paramsparameter of theget()function
r=requests.get(url_get,params=payload)Review Request
- Print out the url if we want to see it
r.url'http://httpbin.org/get?name=Joseph&ID=123'View Request Body
- remember there is not a request.body so this will be none
r.request.bodyView Request Status
- let’s look at the request status code
r.status_code200Read Response as Text
- You can see from the output it might be a json format
- Let’s check for sure
r.text'{\n "args": {\n "ID": "123", \n "name": "Joseph"\n }, \n "headers": {\n "Accept": "*/*", \n "Accept-Encoding": "gzip, deflate", \n "Host": "httpbin.org", \n "User-Agent": "python-requests/2.32.3", \n "X-Amzn-Trace-Id": "Root=1-67621149-619bbbee33711f36459e0ee5"\n }, \n "origin": "76.92.196.161", \n "url": "http://httpbin.org/get?name=Joseph&ID=123"\n}\n'View Content_type
r.headers['Content-Type']'application/json'Read Response Json
- As the content is in the JSON format
- use
json()method to return it as adict
r.json(){'args': {'ID': '123', 'name': 'Joseph'},
'headers': {'Accept': '*/*',
'Accept-Encoding': 'gzip, deflate',
'Host': 'httpbin.org',
'User-Agent': 'python-requests/2.32.3',
'X-Amzn-Trace-Id': 'Root=1-67621149-619bbbee33711f36459e0ee5'},
'origin': '76.92.196.161',
'url': 'http://httpbin.org/get?name=Joseph&ID=123'}- As you see in the output the key (args) and its value: which is what we sent with the get request
List Args
r.json()['args']{'ID': '123', 'name': 'Joseph'}POST Request
- Like a
GETrequest, aPOSTis used to send data to a server - But the
POSTrequest sends the data in a request body - In order to send the Post Request in Python, in the
URLwe change the route toPOST
Set up URL
url_post='http://httpbin.org/post'Create Dictionary
- This endpoint will expect data as a file or as a form. A form is convenient way to configure an HTTP request to send data to a server.
- To make a
POSTrequest we use thepost()function, the variablepayloadis passed to the parameterdata
payload={"name":"Joseph","ID":"123"}Send Request
r_post=requests.post(url_post,data=payload)Compare Requests
- Let’s compare the two requests:
- GET request
- Post request
- We should know that the POST request doesn’t carry any data in its request but sends it in the body
print("POST request URL:",r_post.url )
print("GET request URL:",r.url)
POST request URL: http://httpbin.org/post
GET request URL: http://httpbin.org/get?name=Joseph&ID=123Compare Bodys
- Let’s compare bodies as well
print("POST request body:",r_post.request.body)
print("GET request body:",r.request.body)
POST request body: name=Joseph&ID=123
GET request body: NoneView the Request Form
- As we mentioned that the requested payload is sent in a json form in the body
- Let’s look at it
r_post.json()['form']{'ID': '123', 'name': 'Joseph'}